Getting Started with Roborabbit: How to Automate Browsers
Contents
In today's digital age, the ability to automate repetitive tasks has become increasingly important. One area where automation has been particularly useful is in web browsing. By automating the web browser, you can complete repetitive tasks without having to do it manually, which enables you to shift time and effort to other critical aspects of your work.
If you are a developer, you must have heard of automated browser tools and frameworks like Selenium, Puppeteer, and Playwright. These tools are great for browser automation but you will need to write code to give the browser instructions.
In this article, we will introduce a browser automation tool called Roborabbit, a scalable, cloud-based service that requires minimum coding to automate the web browser, making web automation easier than ever for developers.
What You Can Do with Browser Automation
Testing
Testing is a crucial part of web development. Testing websites and web applications ensure that they are working as expected on different browsers and devices. By automating the browser to do testing, you can test more efficiently compared to manual testing and catch issues that might be difficult to find otherwise.
Web Scraping
Browser automation can be used to scrape and extract data from websites. This is useful for tasks like market research, competitive analysis, data mining, or any other purposes that require large amounts of data. With browser automation, you can gather data much faster than you could manually.
Task Automation
Many user actions can be automated using a browser automation tool. This includes actions like filling out forms, clicking buttons, and navigating to specific pages. By automating these actions, you can automate tasks such as creating user accounts, filling out surveys, or entering data into a web-based application.
Monitoring
Automated browsers can also be used to monitor websites and web applications for changes or errors. This can be useful for detecting issues such as broken links, page layout issues, or other problems that could affect user experience. Besides that, businesses can also use browser automation to monitor competitors’ prices or other latest updates.
What is Roborabbit
Roborabbit is a scalable, cloud-based browser automation tool that helps you to automate any browser task. From automated website testing, scraping data, taking scheduled screenshots for archiving, to automating other repetitive browser tasks, you can do it with Roborabbit.
Similar to Bannerbear, the featured automated image and video generation tool from the same company, you can easily create no-code automated workflows by integrating it with other apps like Google Sheets, Airtable, and more on Zapier. Besides that, you can also use the REST API to trigger tasks to run in the cloud and receive data from the completed tasks. As the tasks run in the cloud, you can create as many tasks as you need without affecting your machine's performance.
Creating an Browser Automation with Roborabbit
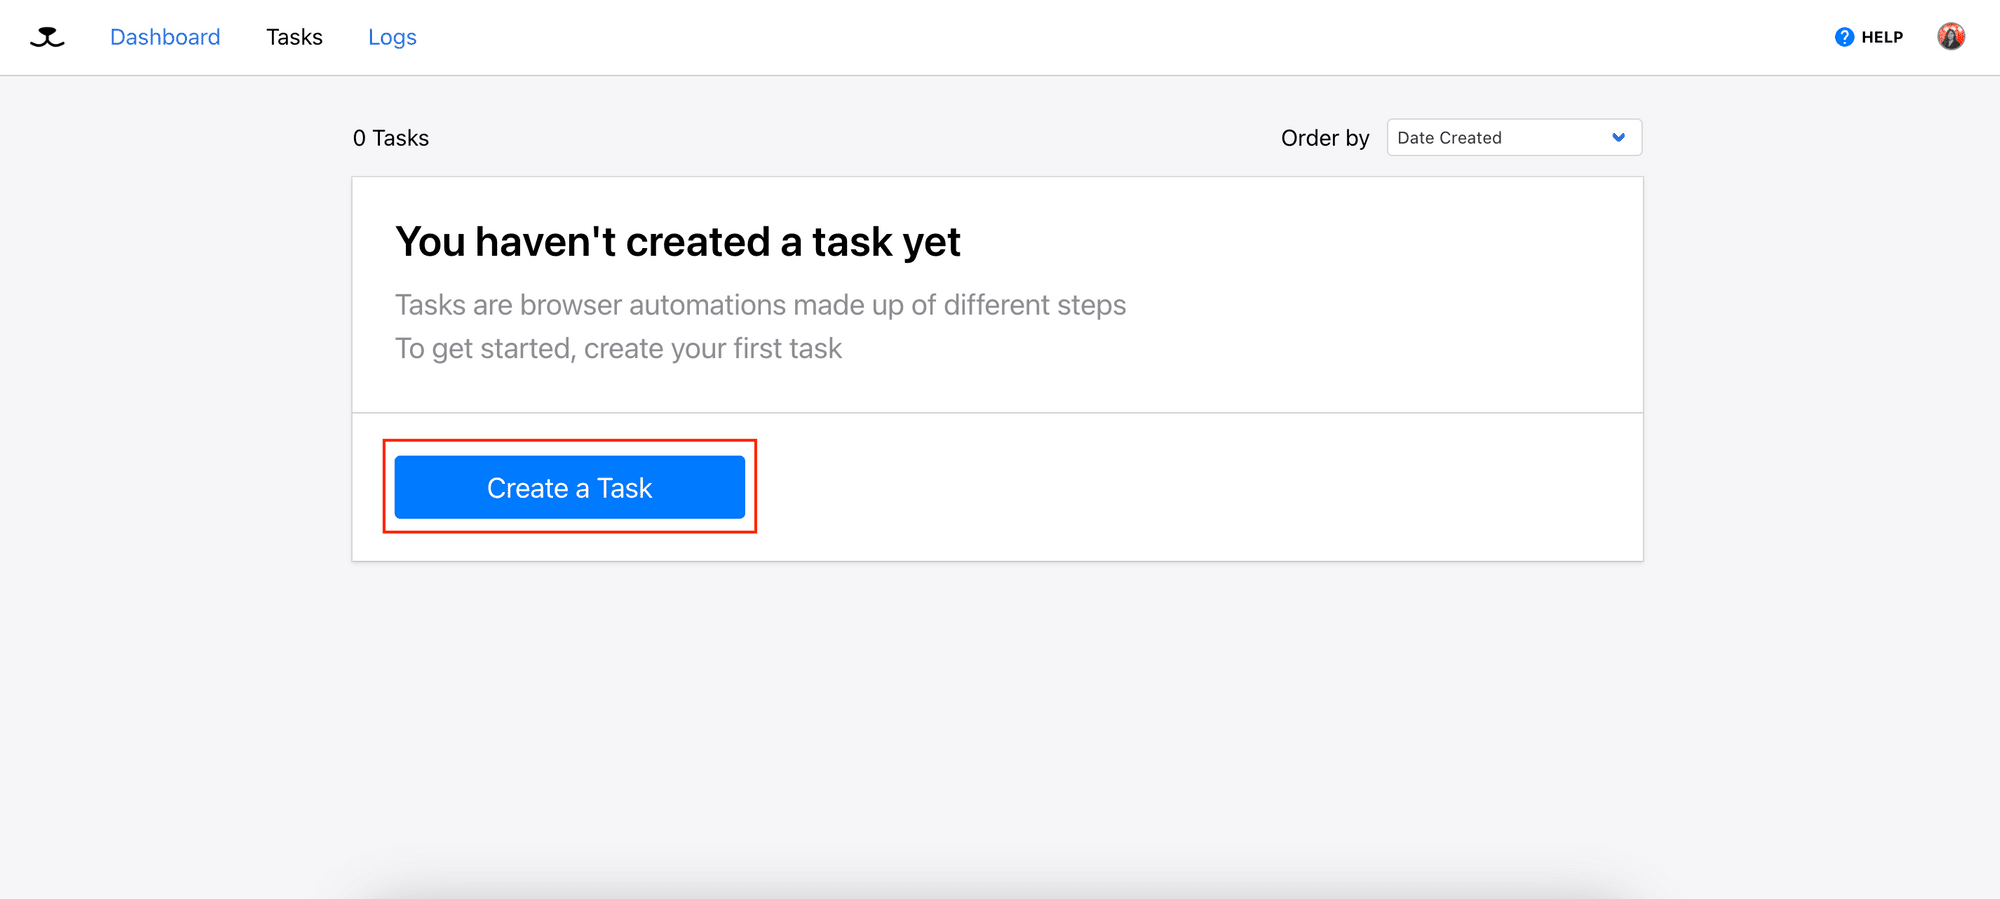
Step 1. Create a Task
You will need a Roborabbit account to create an automation task (create a free trial account ). After logging in to your account, go to Tasks and create a new task.
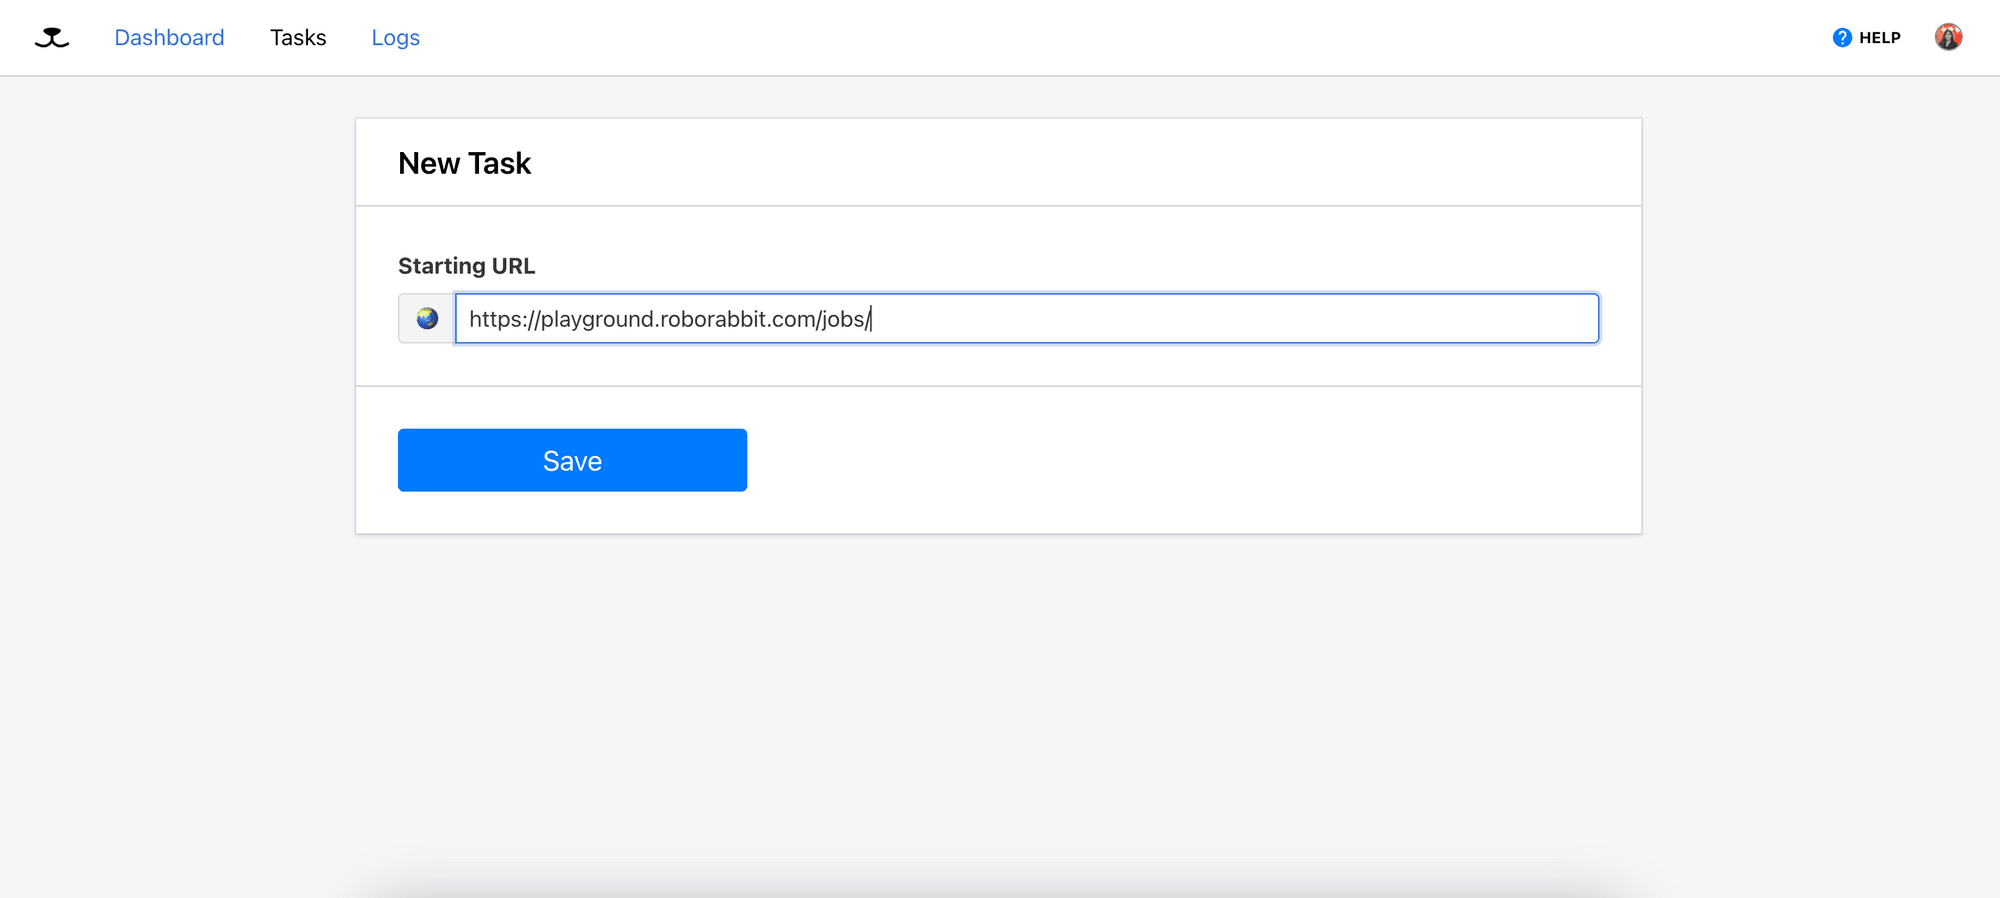
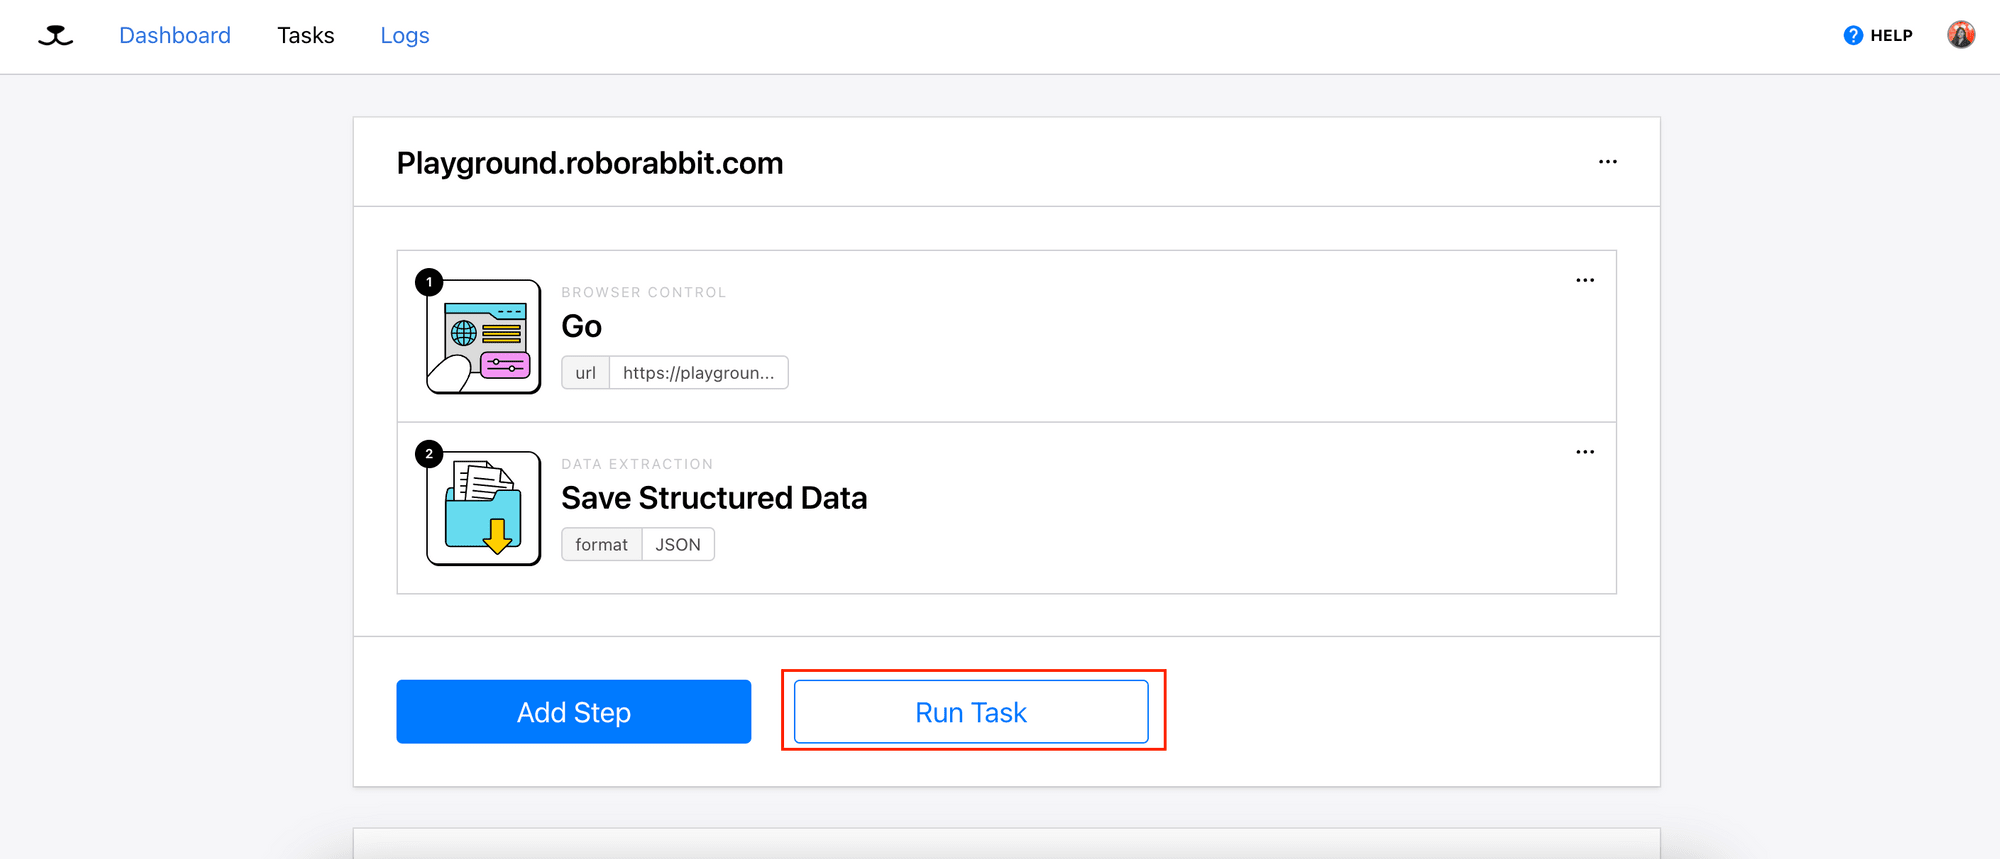
Enter the target URL for your task and click the “Save” button.
The "Go" action will be automatically added as the first step of the task to visit the starting URL:
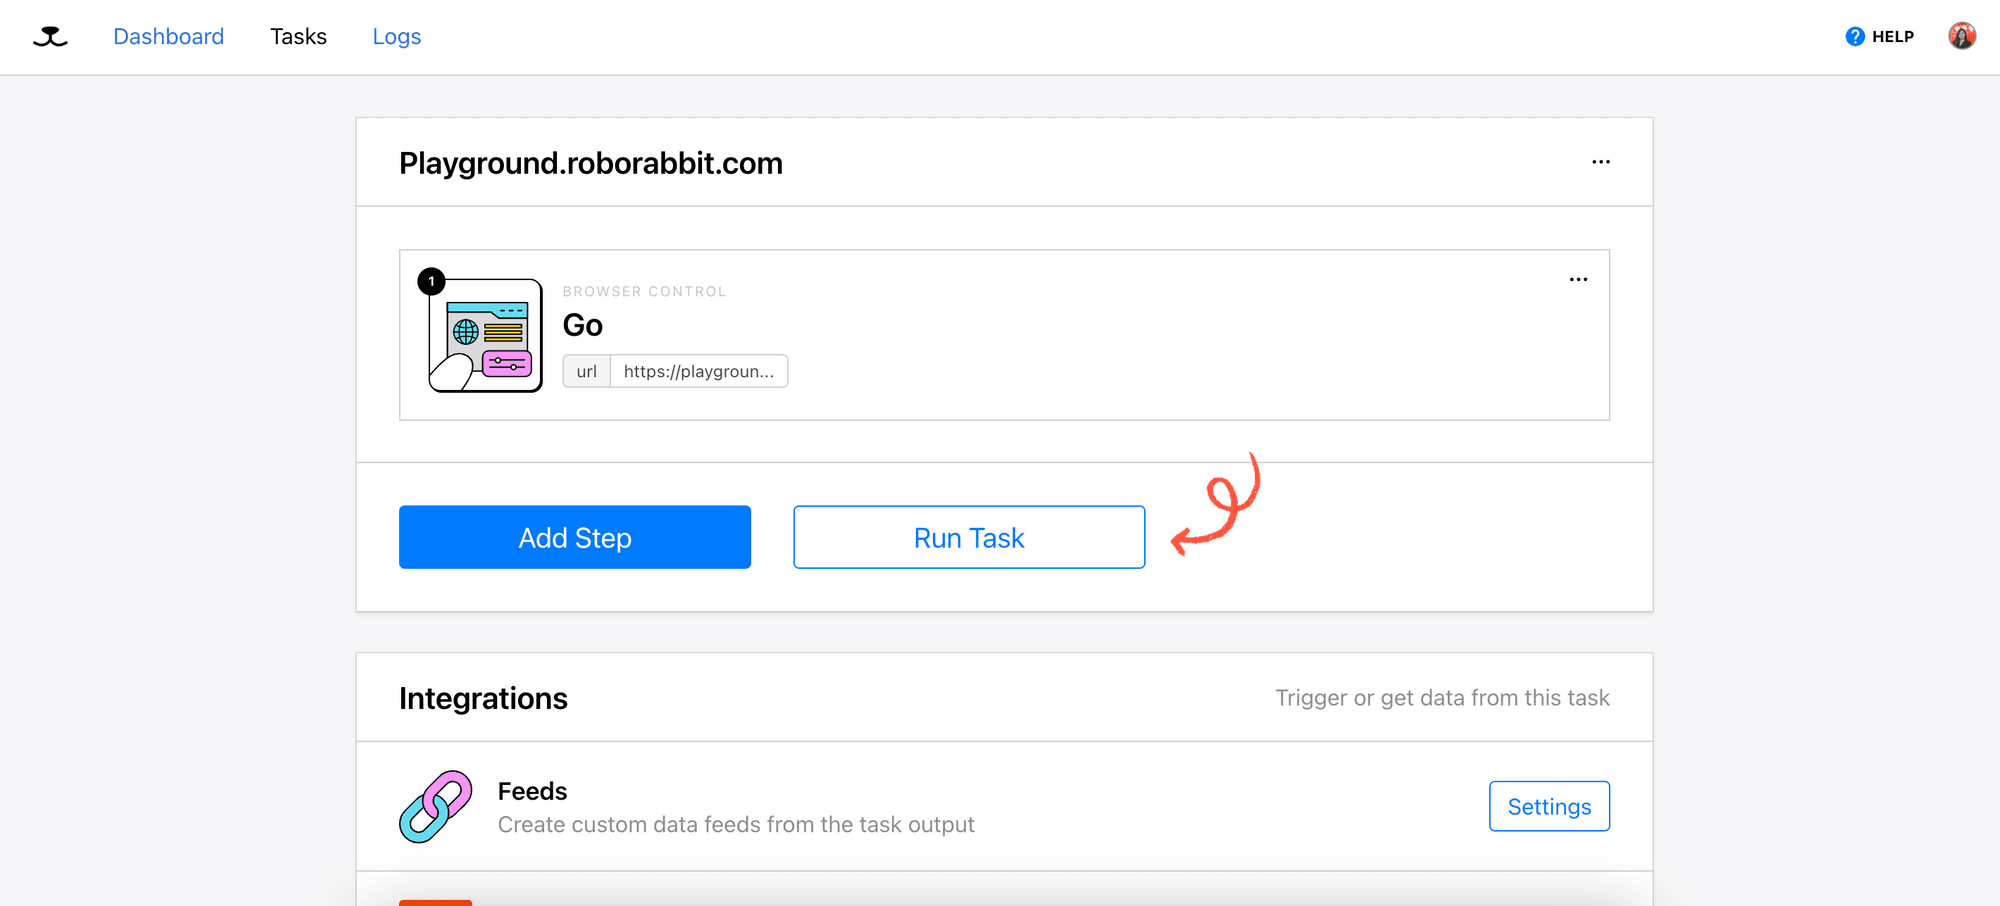
Step 2. Add Steps
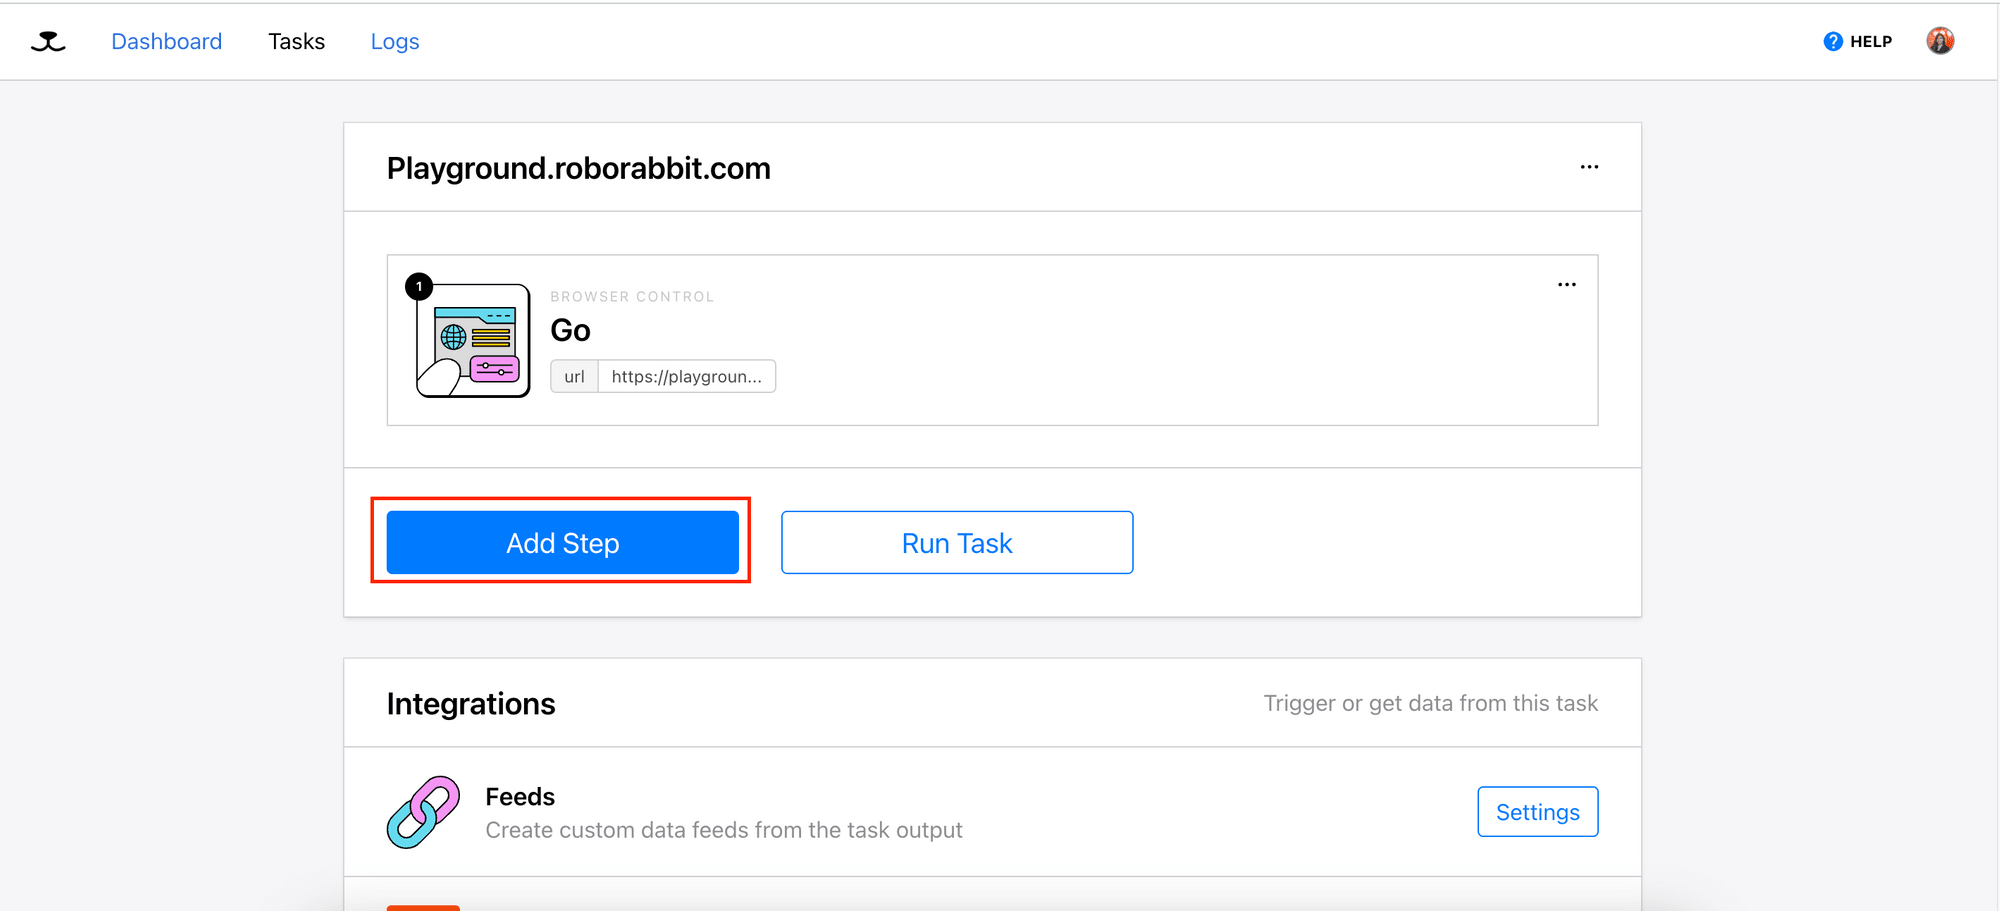
Now, you can start adding the steps required for your task. Click on “Add Step” to add a new step.
On the popup window, you can select an action from the list of actions. Different actions will require you to provide different details for the step.
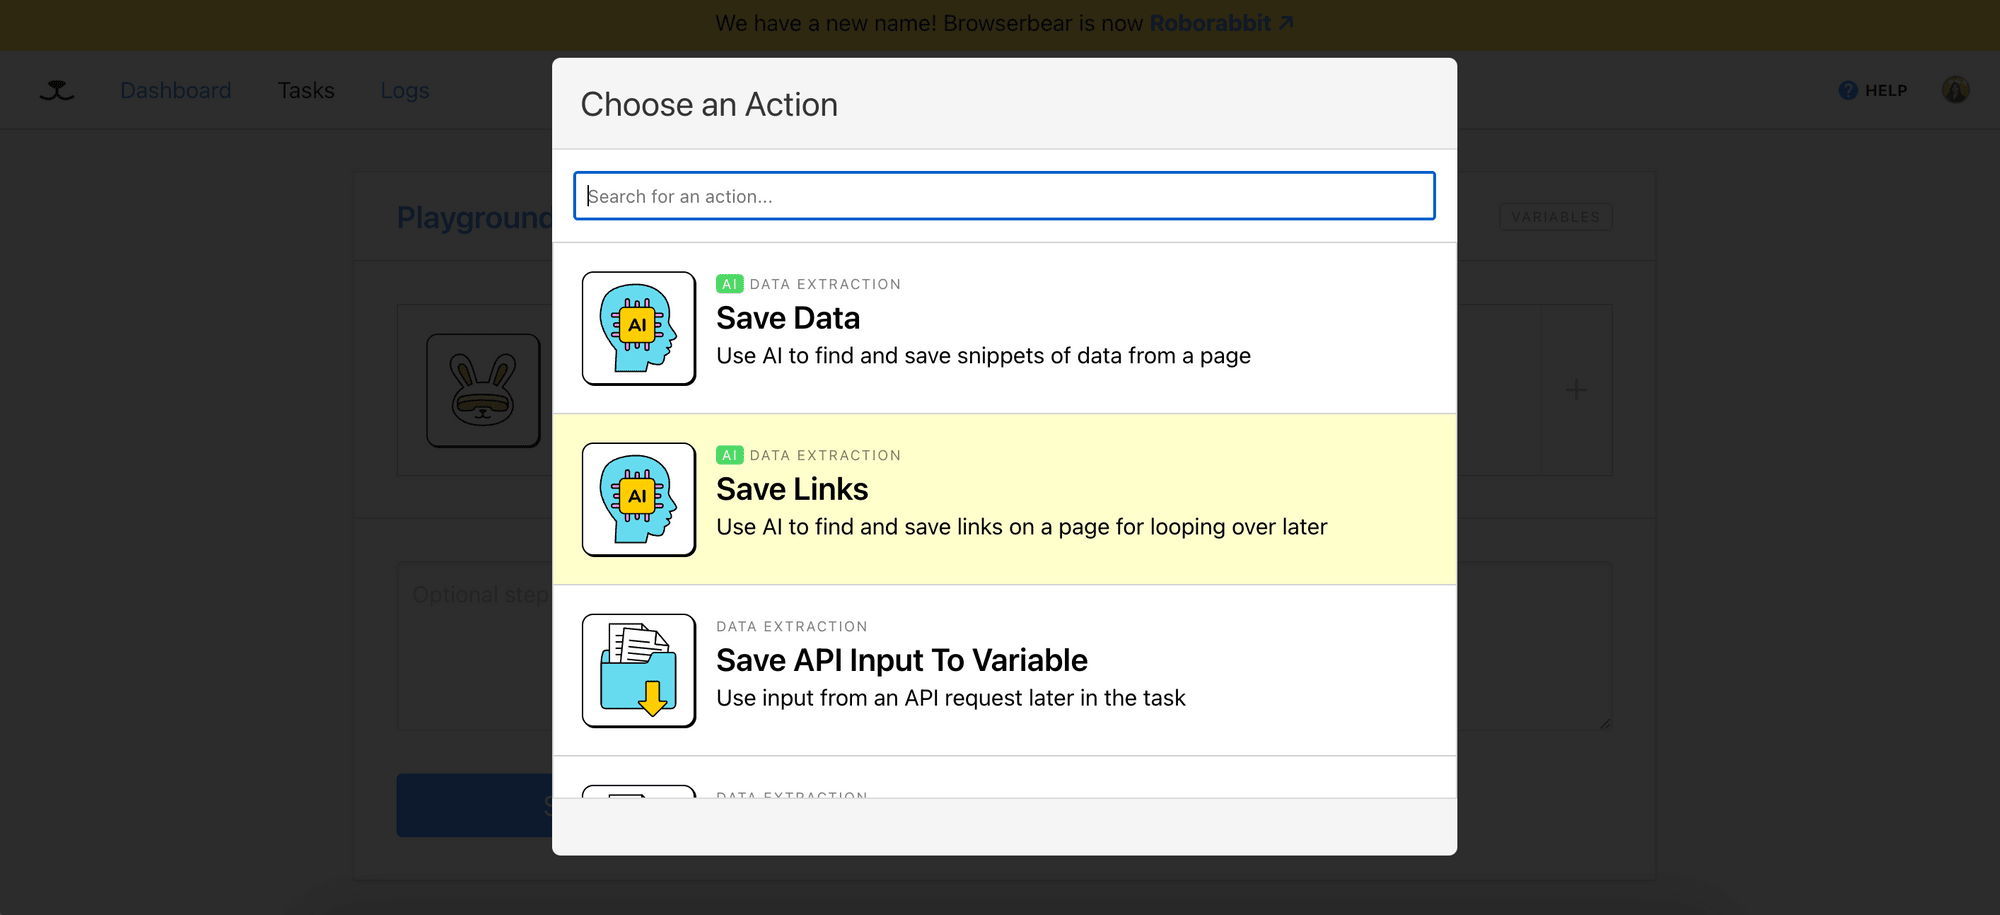
For example, for actions like “Assert”, “Click”, “Save Structured Data”, etc., you will need to locate some specific HTML elements to perform the action. For these actions, you can install the RoborabbitHelper Chrome extension to get a JSON object that contains the XPath and the HTML snippet of the element, and add it to the Element textbox.
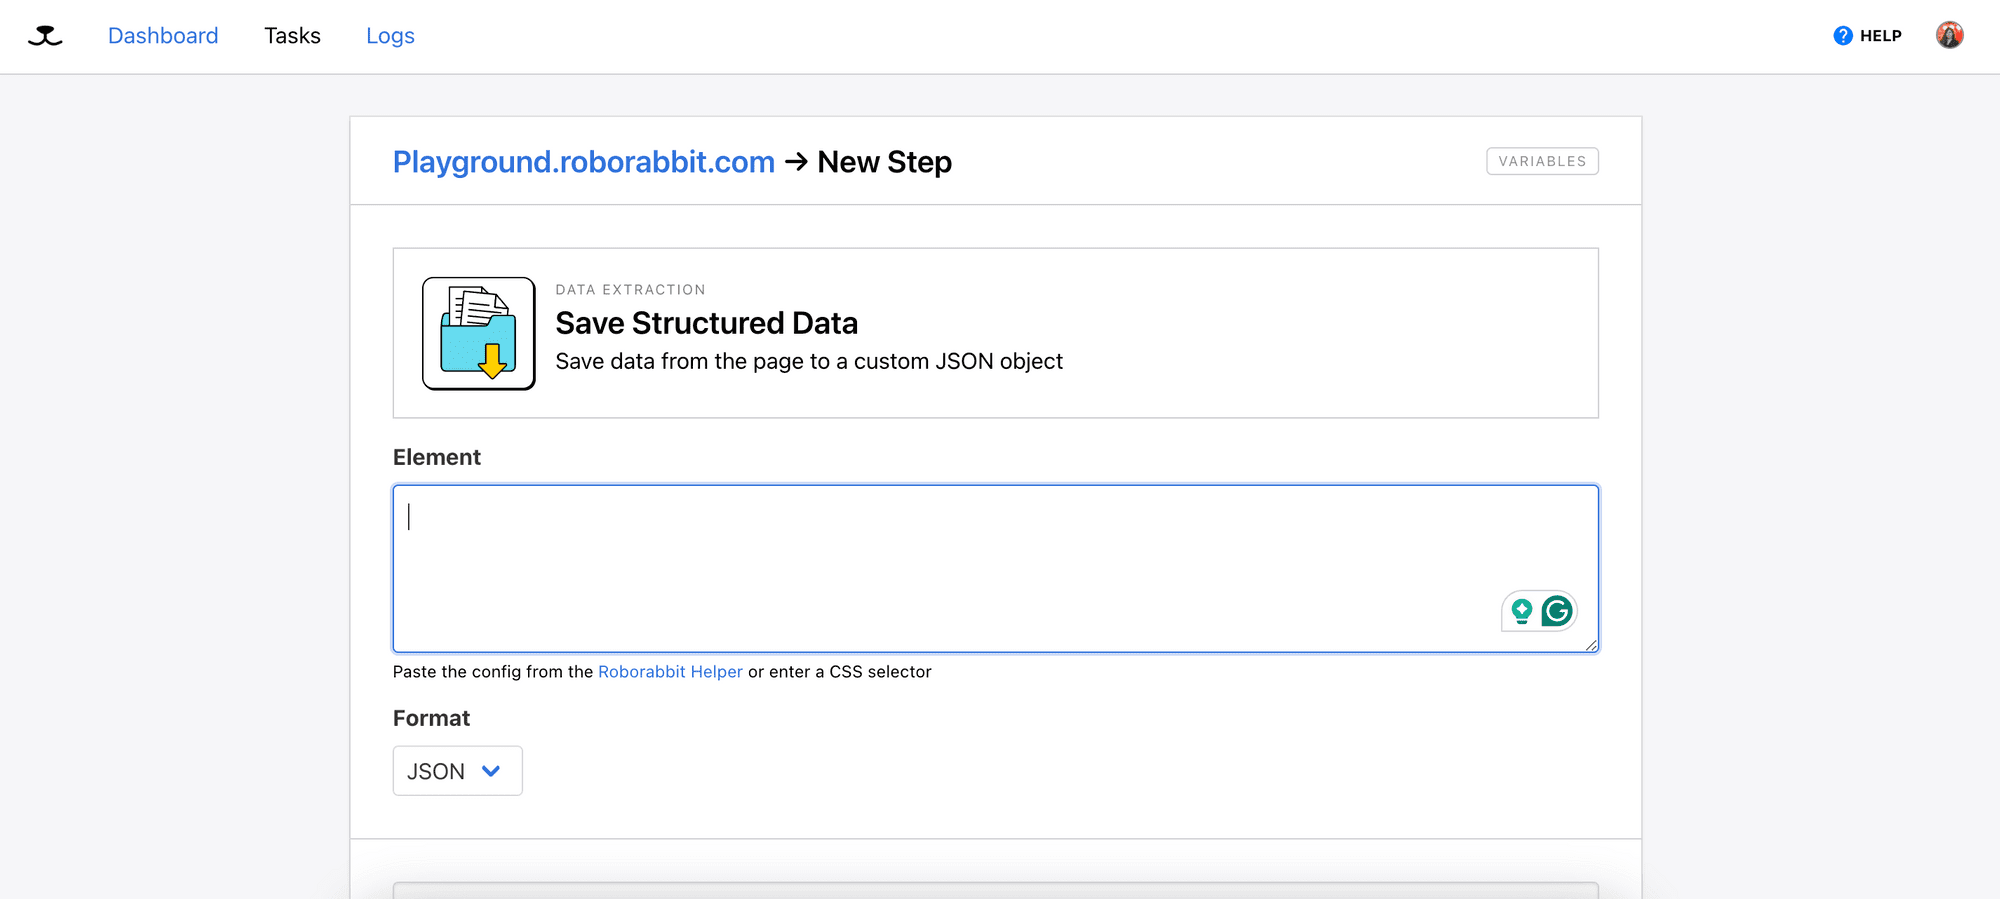
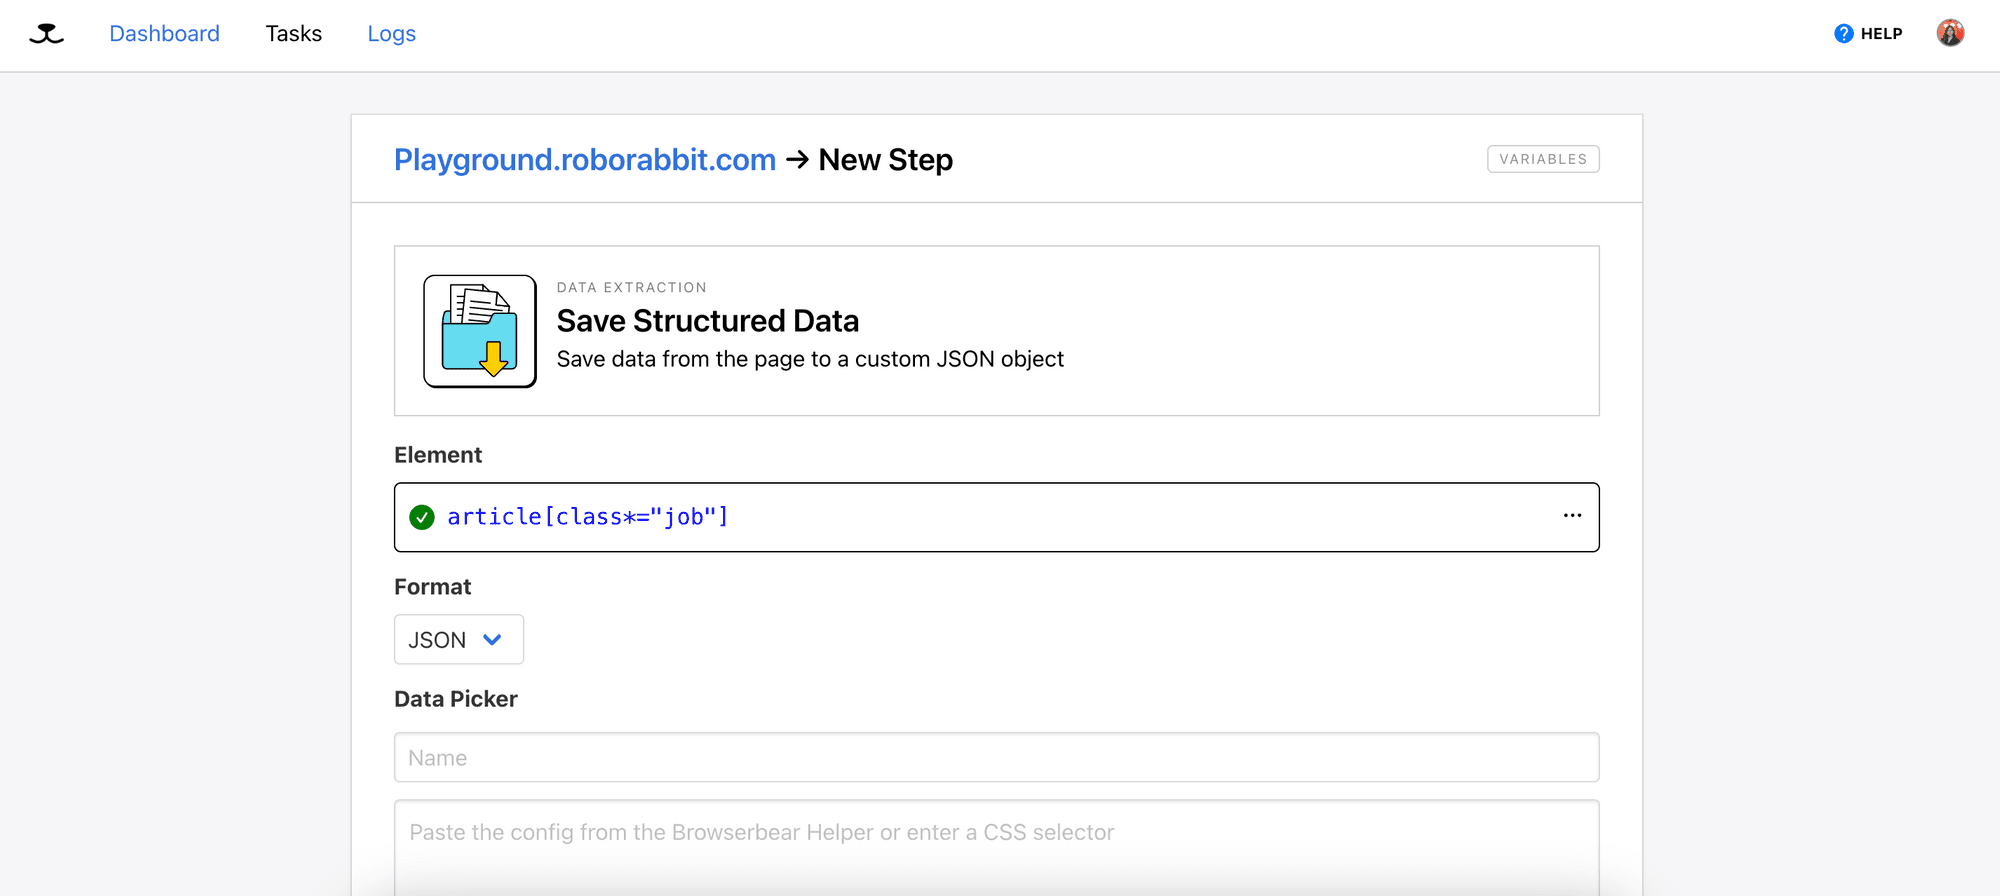
This will help Roborabbit to locate the HTML elements on the website. Click the “Save” button and you should see the step added to your task.
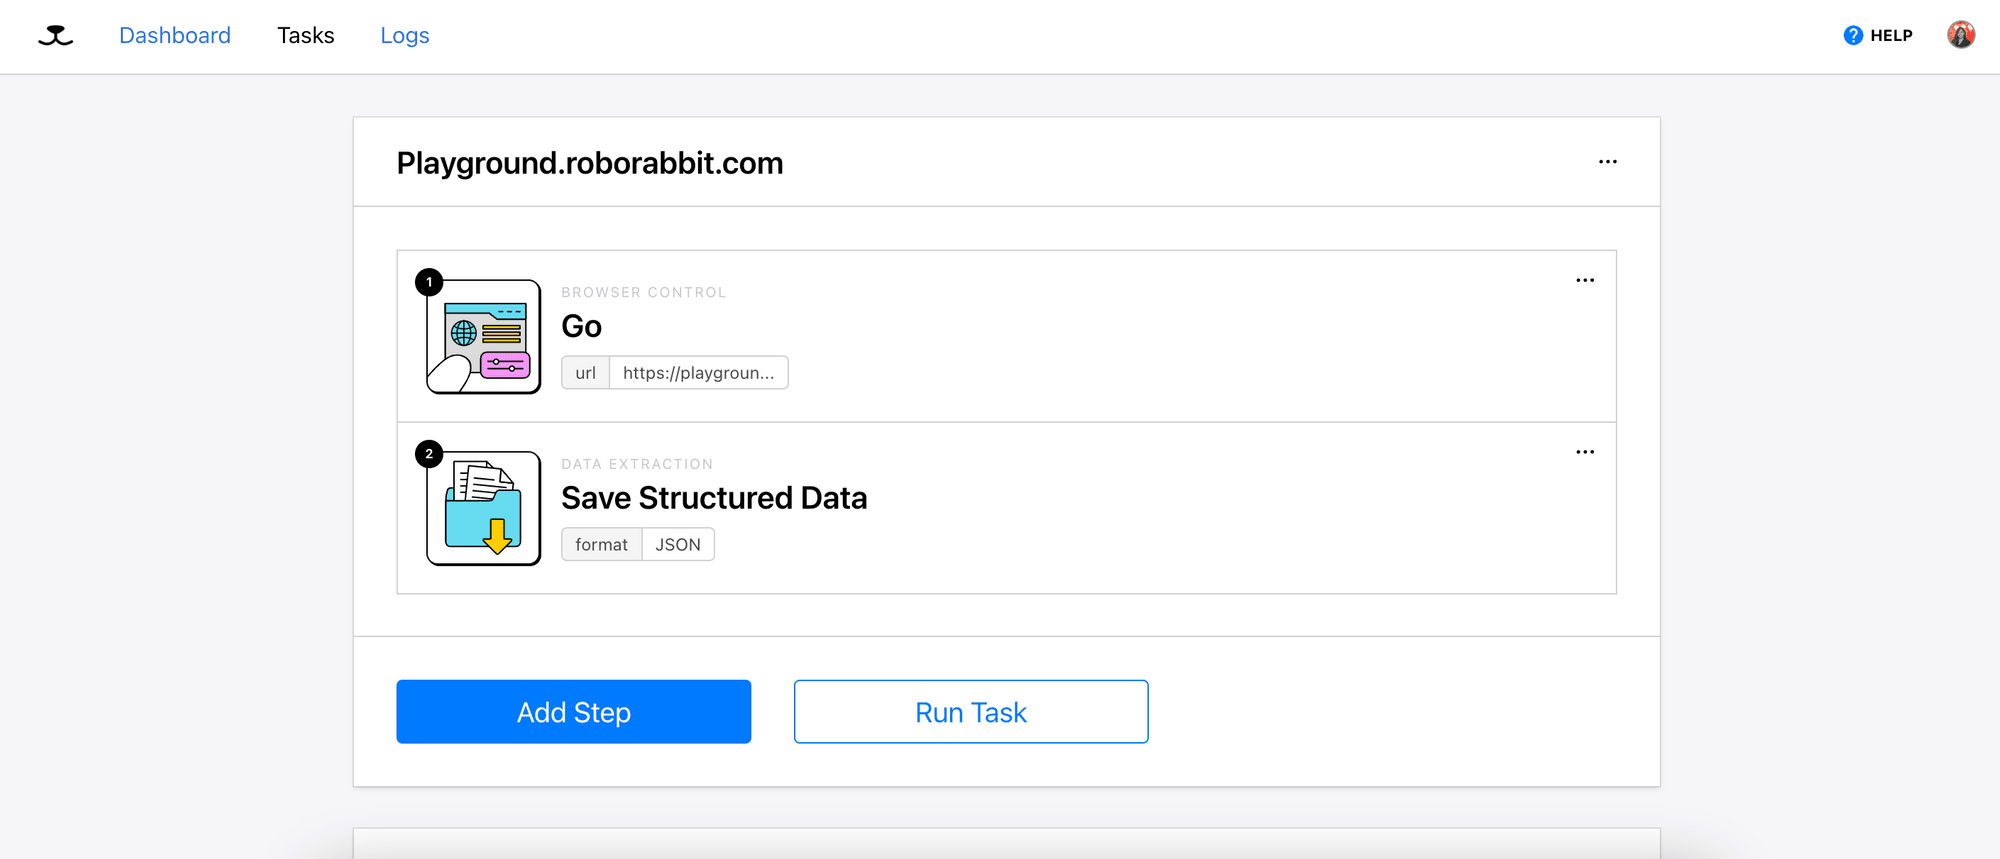
Add as many steps as you need to the task.
🐻 Bear Tips: Refer to How to Scrape Data from a Website UsingRoborabbit to learn how to use the Roborabbit Helper Chrome extension.
Step 3. Run The Task
After you’re done adding all the steps needed, click “Run Task” to execute it.
You should see the status of the run when you scroll down the page.
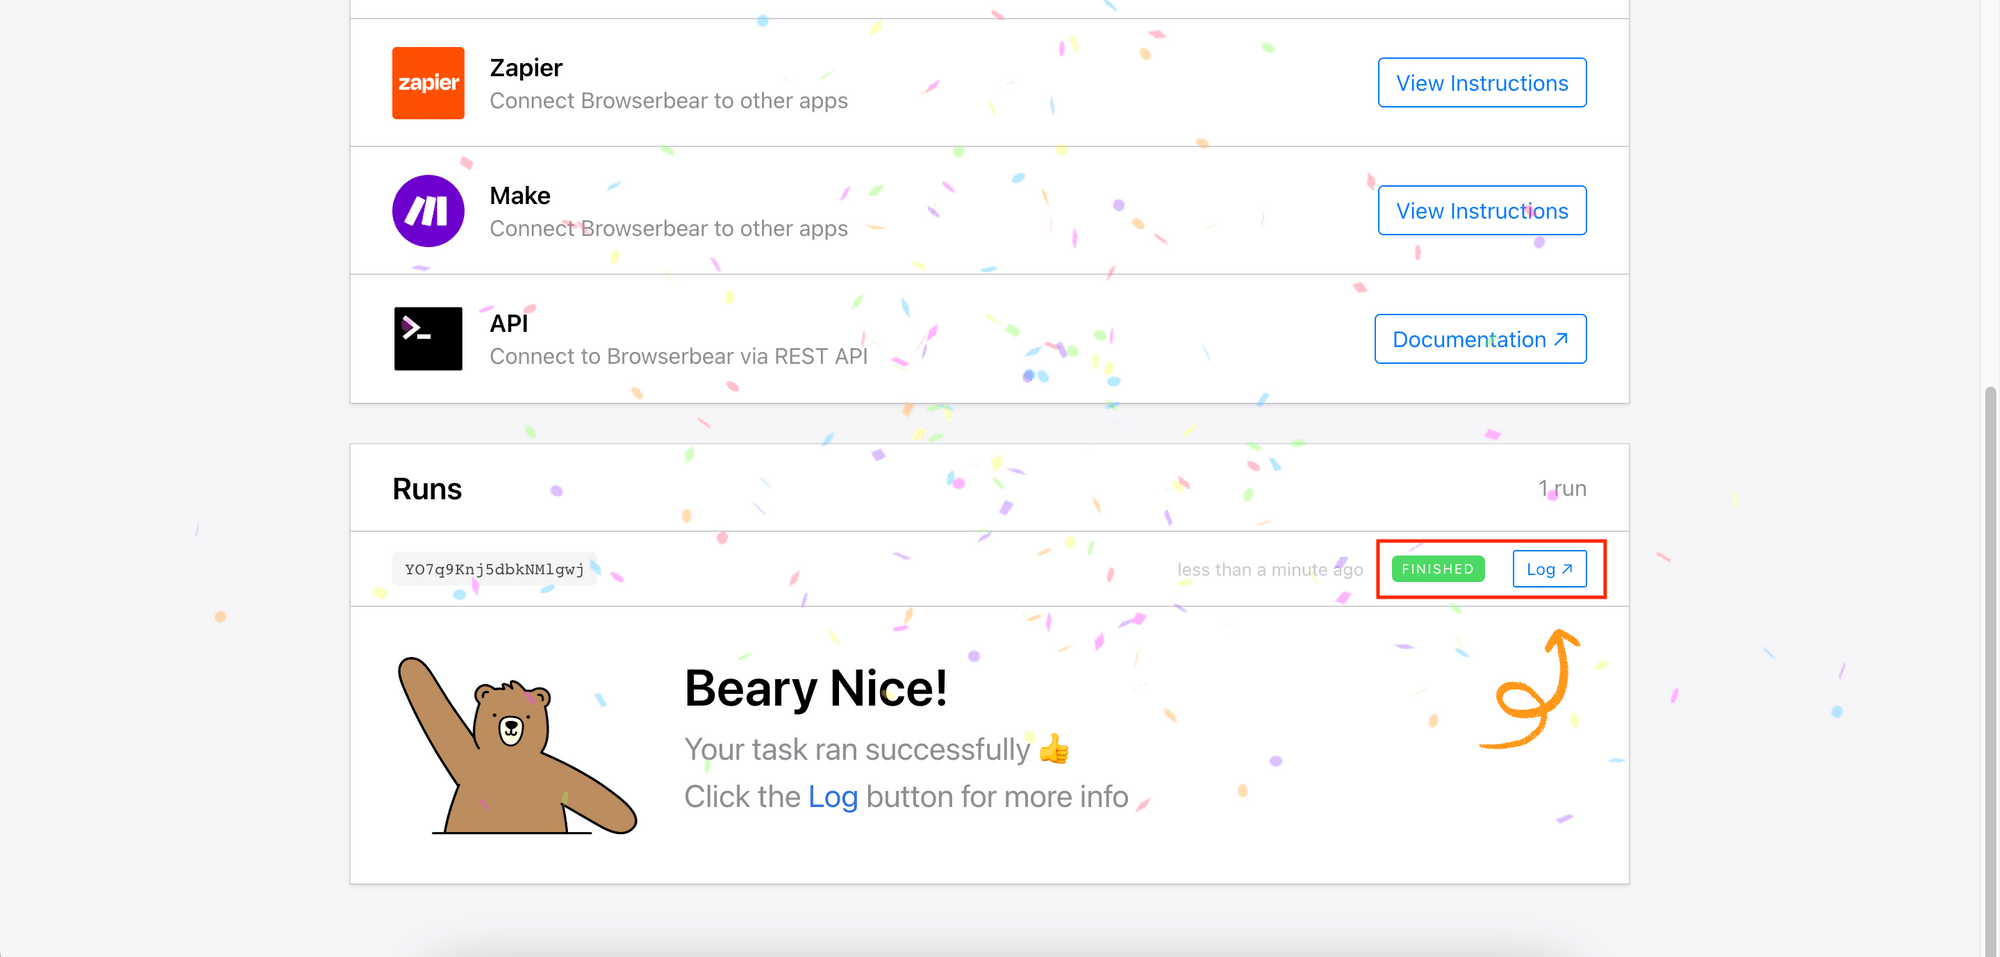
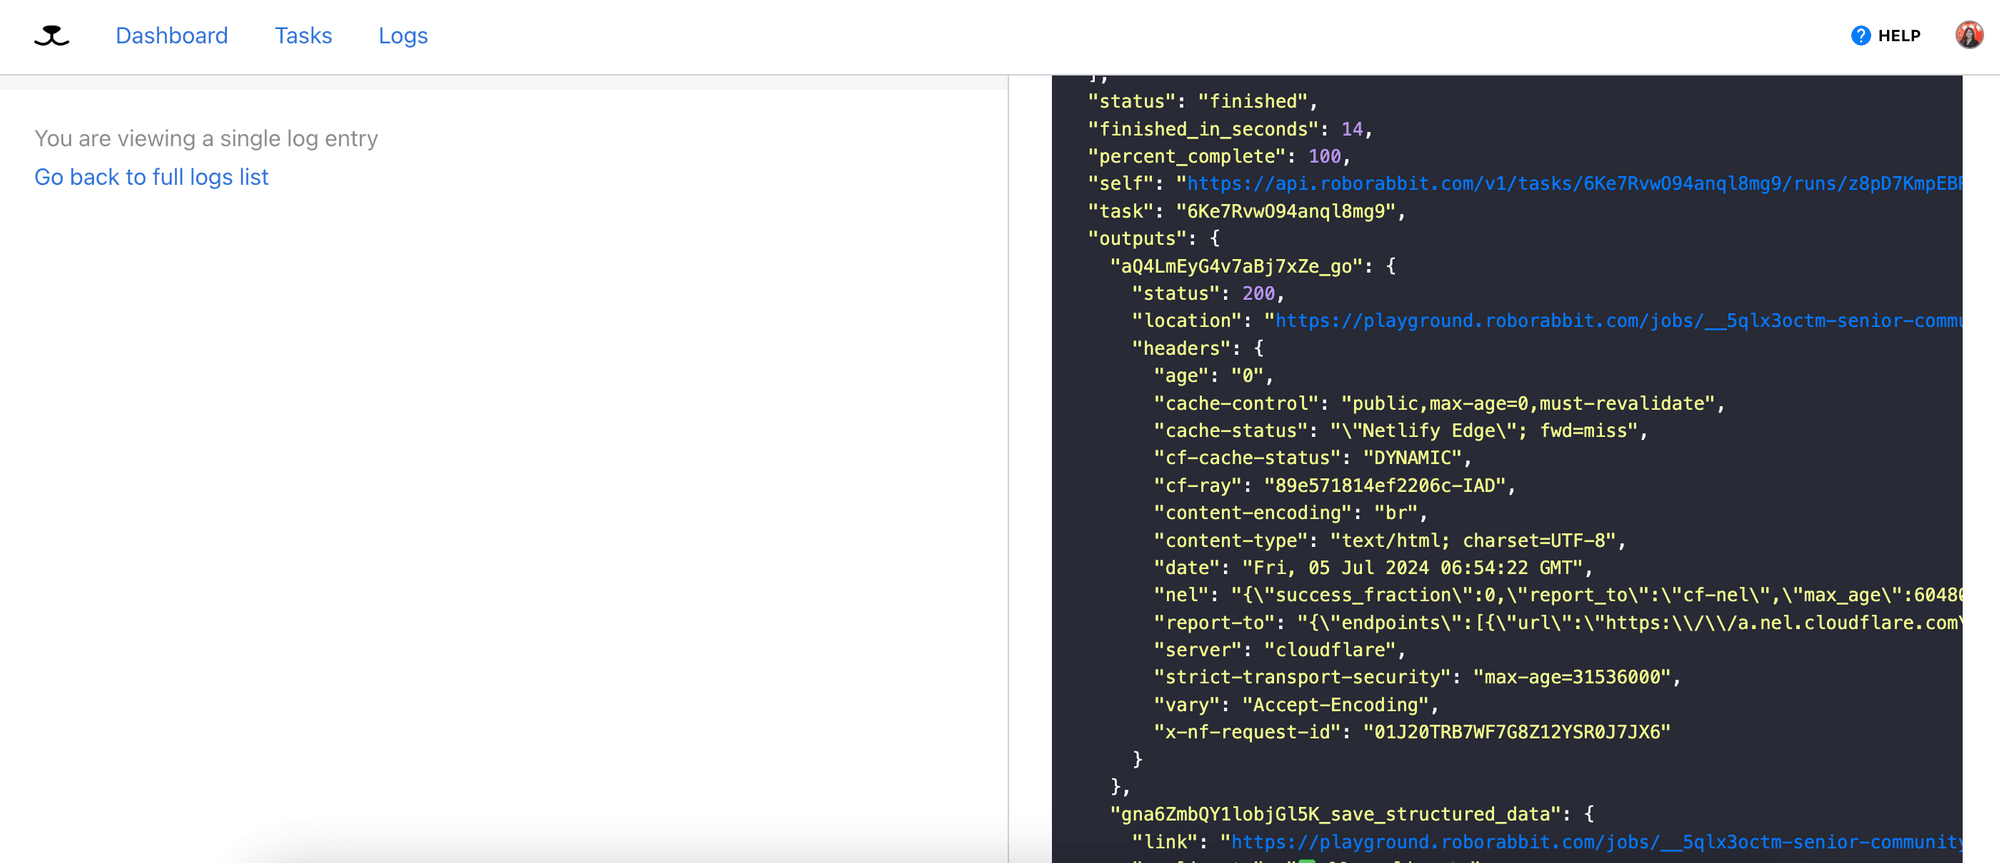
Click on “Log” to view the result and details of the run:
Whenever you create a task in Roborabbit, you can access and run it via Zapier integration and RESTAPI (making HTTP requests). This enables you to integrate the task with other applications such as Google Sheets, Notion, Airtable, etc., or make a scheduled trigger to create an automated workflow.
The Roborabbit API is asynchronous. If you’re triggering the task using the REST API and want to receive the result automatically, you can use a webhook. The result will be sent to the webhook URL provided when the task has finished running.
Here’s an example in Python:
post_url = f"https://api.roborabbit.com/v1/tasks/{task_uid}/runs"
data = {"webhook_url" : "your_webhook_url"}

response = requests.post(url, headers=headers, json=data)
Overwriting the Default Configurations
Although the automation tasks are created using Roborabbit's UI interface, you can still modify the steps in your code by stating a new value for them, like the new URL for the “Go” action below:
post_url = f"https://api.roborabbit.com/v1/tasks/{task_uid}/runs"
data = {
	"webhook_url" : "your_webhook_url",
	"steps": [
		# overwrite the original URL
	    {
	      "uid": "GNqV2ngBmly7O9dPRe",
	      "action": "go",
	      "config": {
	        "url": "https://twitter.com/apple"
	      }
	    }
	  ]
}

response = requests.post(url, headers=headers, json=data)
When you make a POST request to the API endpoint, it will go to the new URL instead of the default one that is added from the Roborabbit dashboard.
Sharing Your Roborabbit Automation Task
You can share your Roborabbit task by making it public. Then, you will get a shareable link to that task with the steps listed.
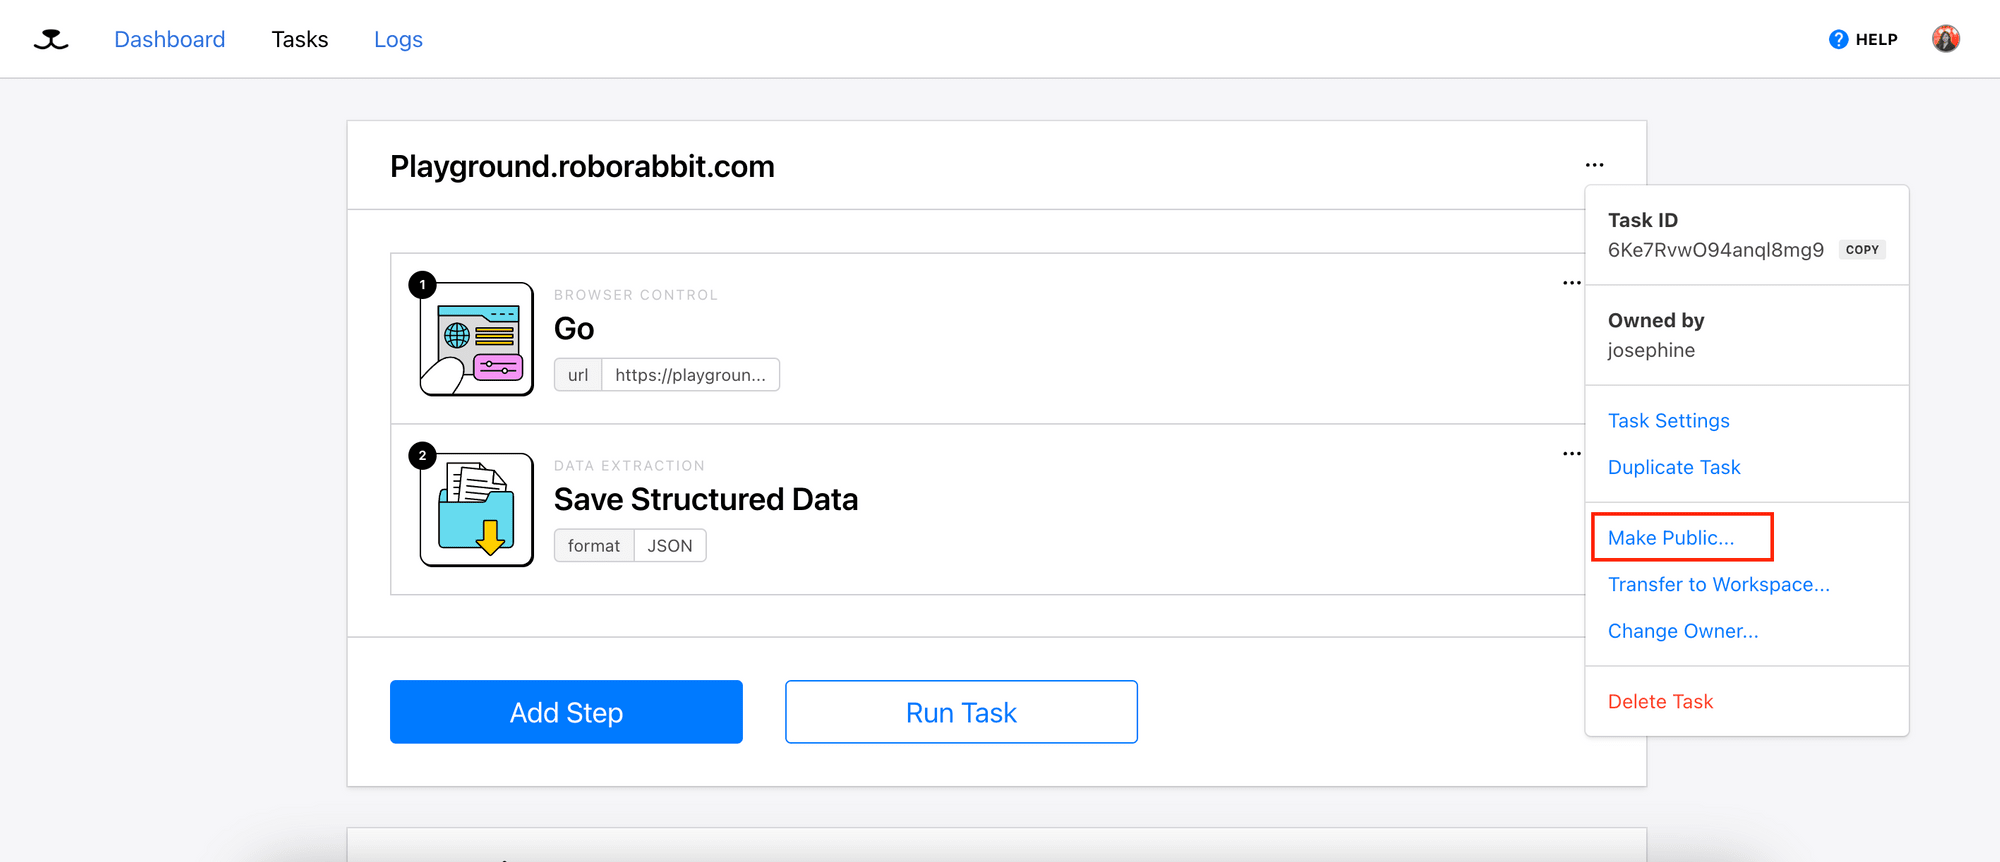
Any visitor with a Roborabbit account will be able to duplicate the task into their account and use it immediately.
Browser Automation Examples/Templates
For common tasks like filling in a form, testing an HTML element, scraping a web page, and taking a screenshot, you can find ready-made Roborabbit tasks in the Roborabbit Academy.
Simply select a task and and click on "Use This Task" to add it to your account to start automating immediately.
Let’s see what you can do with these tasks:
1. Taking Screenshots - Website Screenshots
This task goes to a URL, click on a selected HTML element, and take a full-page screenshot of the page. You can also take a screenshot in the size of the window by deselecting the "Full Page" checkbox.
Result:
{
  "go": {
    "status": 200,
    "location": "https://www.wikipedia.org/",
    ...
  },
  "take_screenshot": "https://media.roborabbit.com/screenshots/8BzjbRQRzrbAQ2qEKd/lYXA8Kz1585zLV94N7/98635a013af1f751689c4e54bf9b2d99589da596.jpg"
}
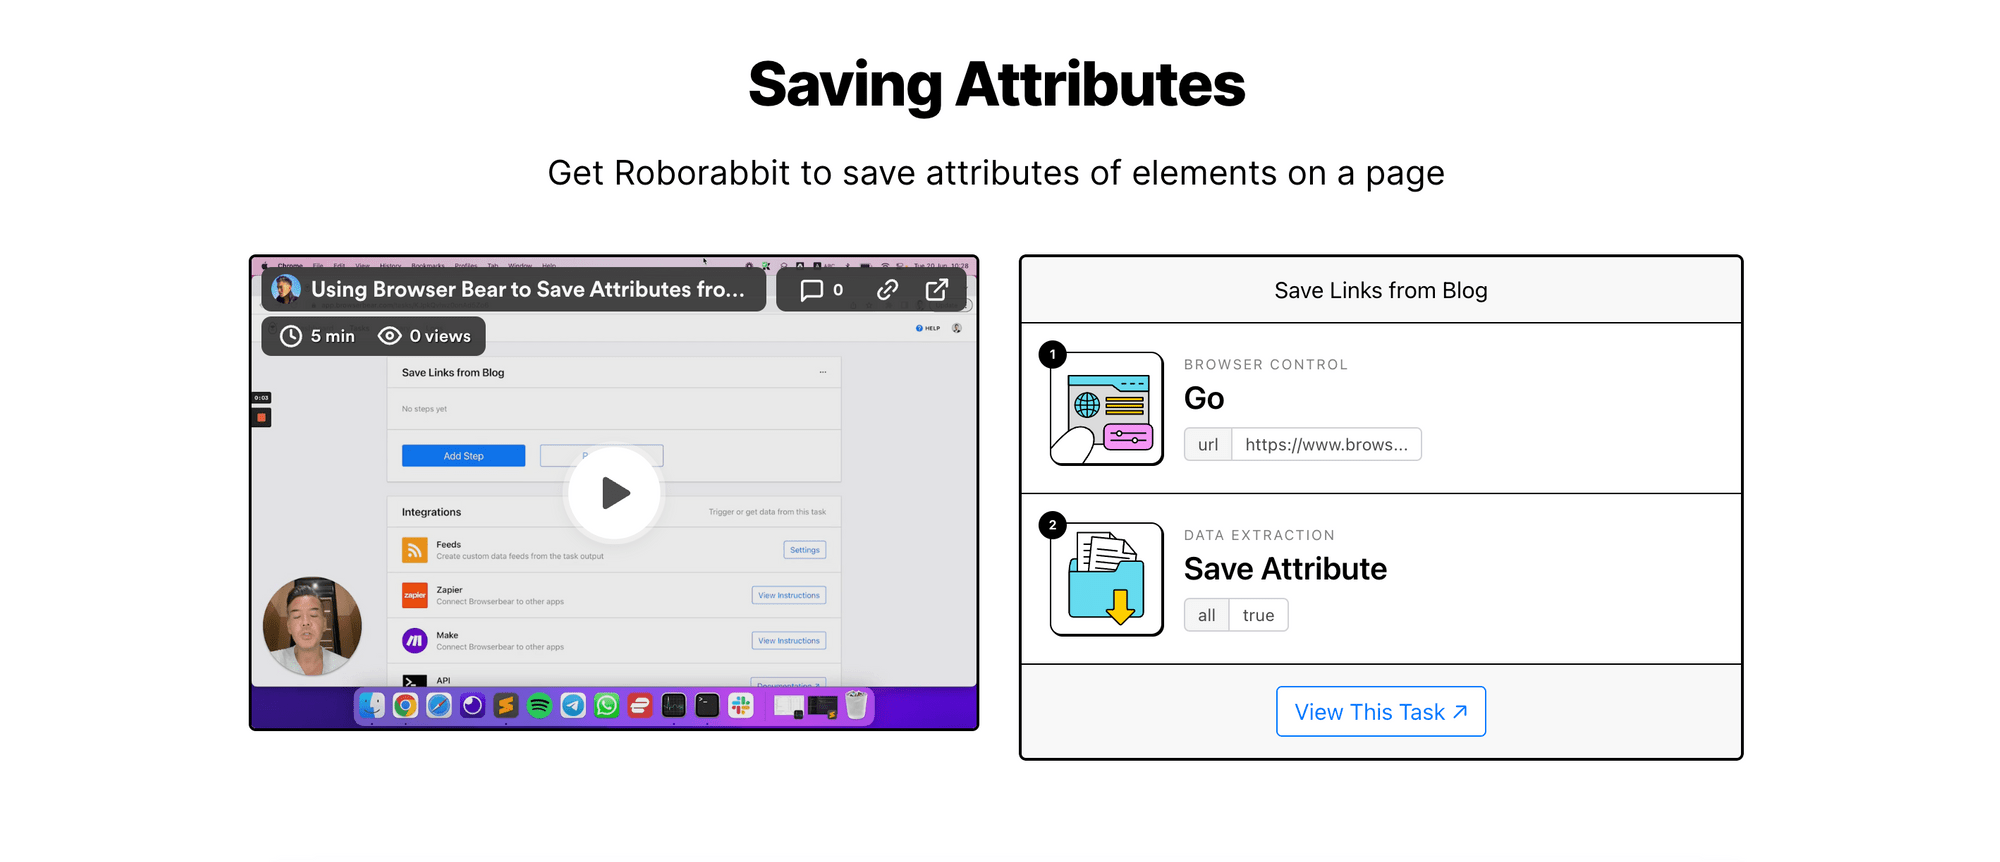
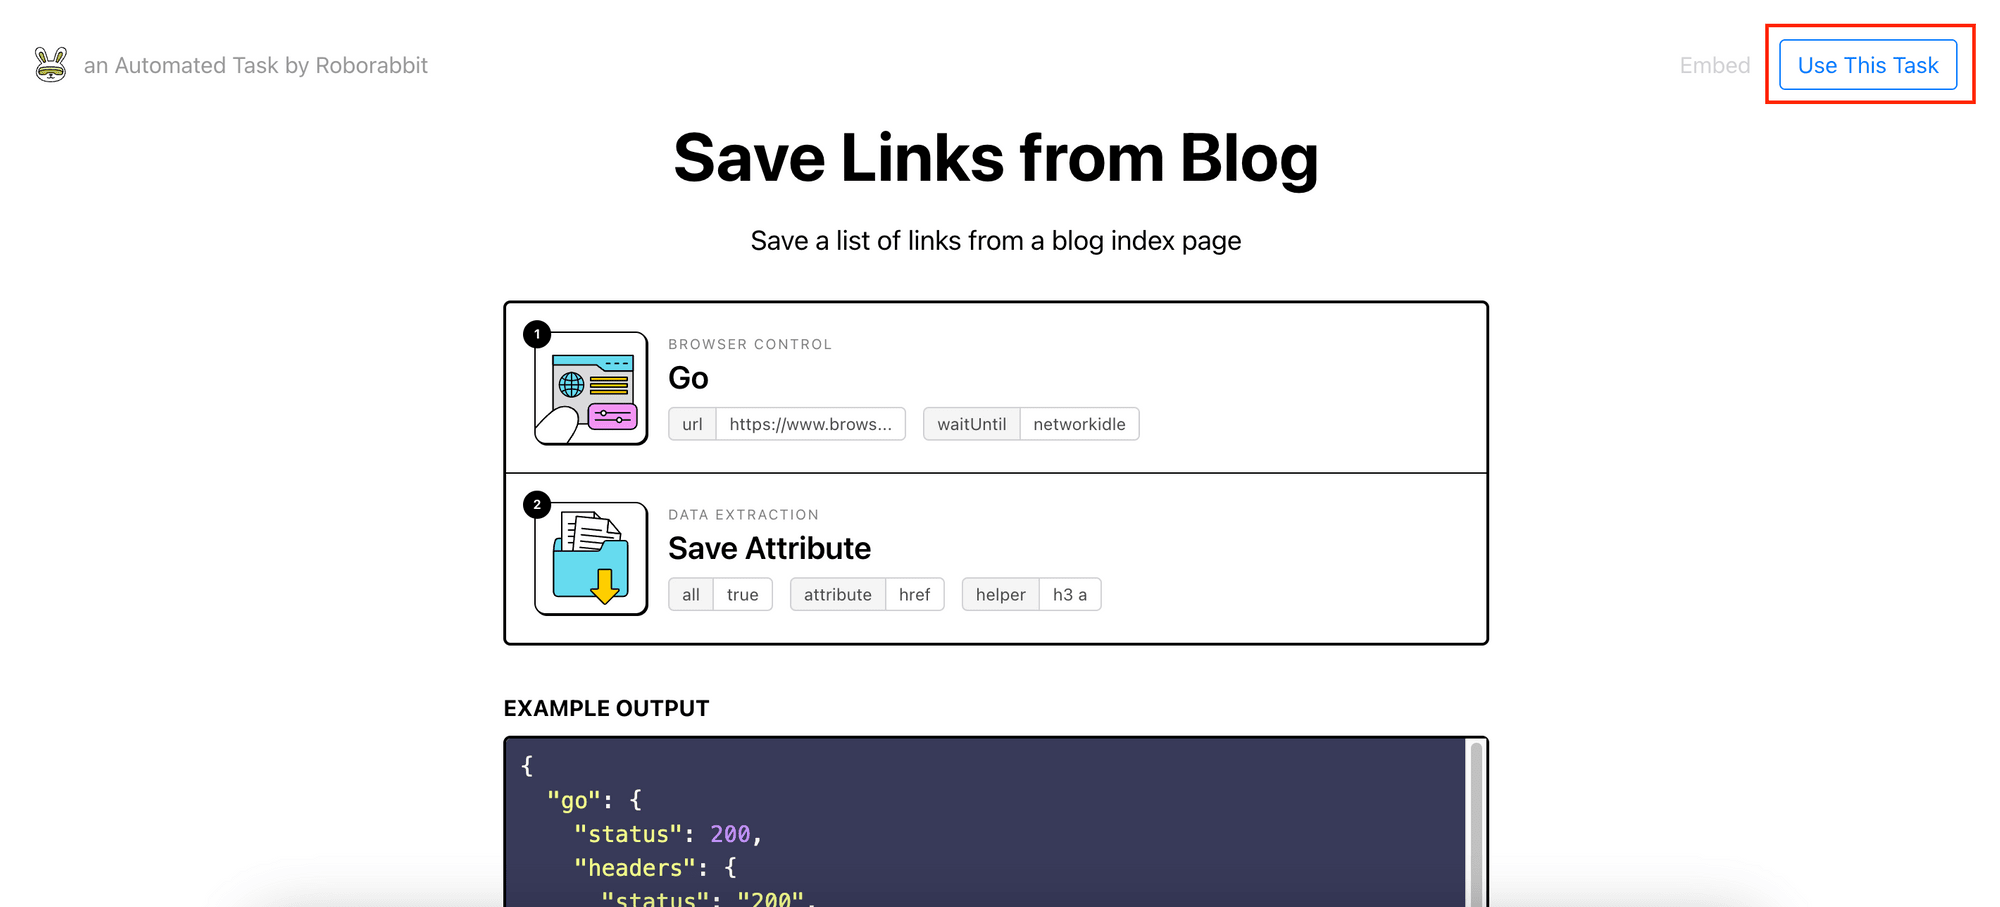
2. Saving Attributes - Saving the Attributes of a Selected Element
This task saves a list of links from a blog index page by saving all the href attributes found on the page.
Result:
{
  "go": {
    "status": 200,
    ...
  },
  "save_attribute": [
    "/blog/how-to-auto-fill-forms-with-data-from-a-csv-file-in-python-using-browserbear/",
    "/blog/xpath-cheat-sheet-a-quick-reference-to-essential-xpath-expressions/",
    "/blog/solving-captchas-automatically-with-browserbear/",
    "/blog/how-to-use-curl-in-python-with-examples/",
    "/blog/a-brief-guide-to-line-items-arrays-and-strings-in-zapier/",
    "/blog/playwright-vs-cypress/",
    "/blog/how-to-build-a-personal-job-listings-aggregator/",
    "/blog/everything-you-need-to-know-about-the-xpath-contains-function/",
    "/blog/how-to-scrape-lists-with-browserbear/"
  ]
}
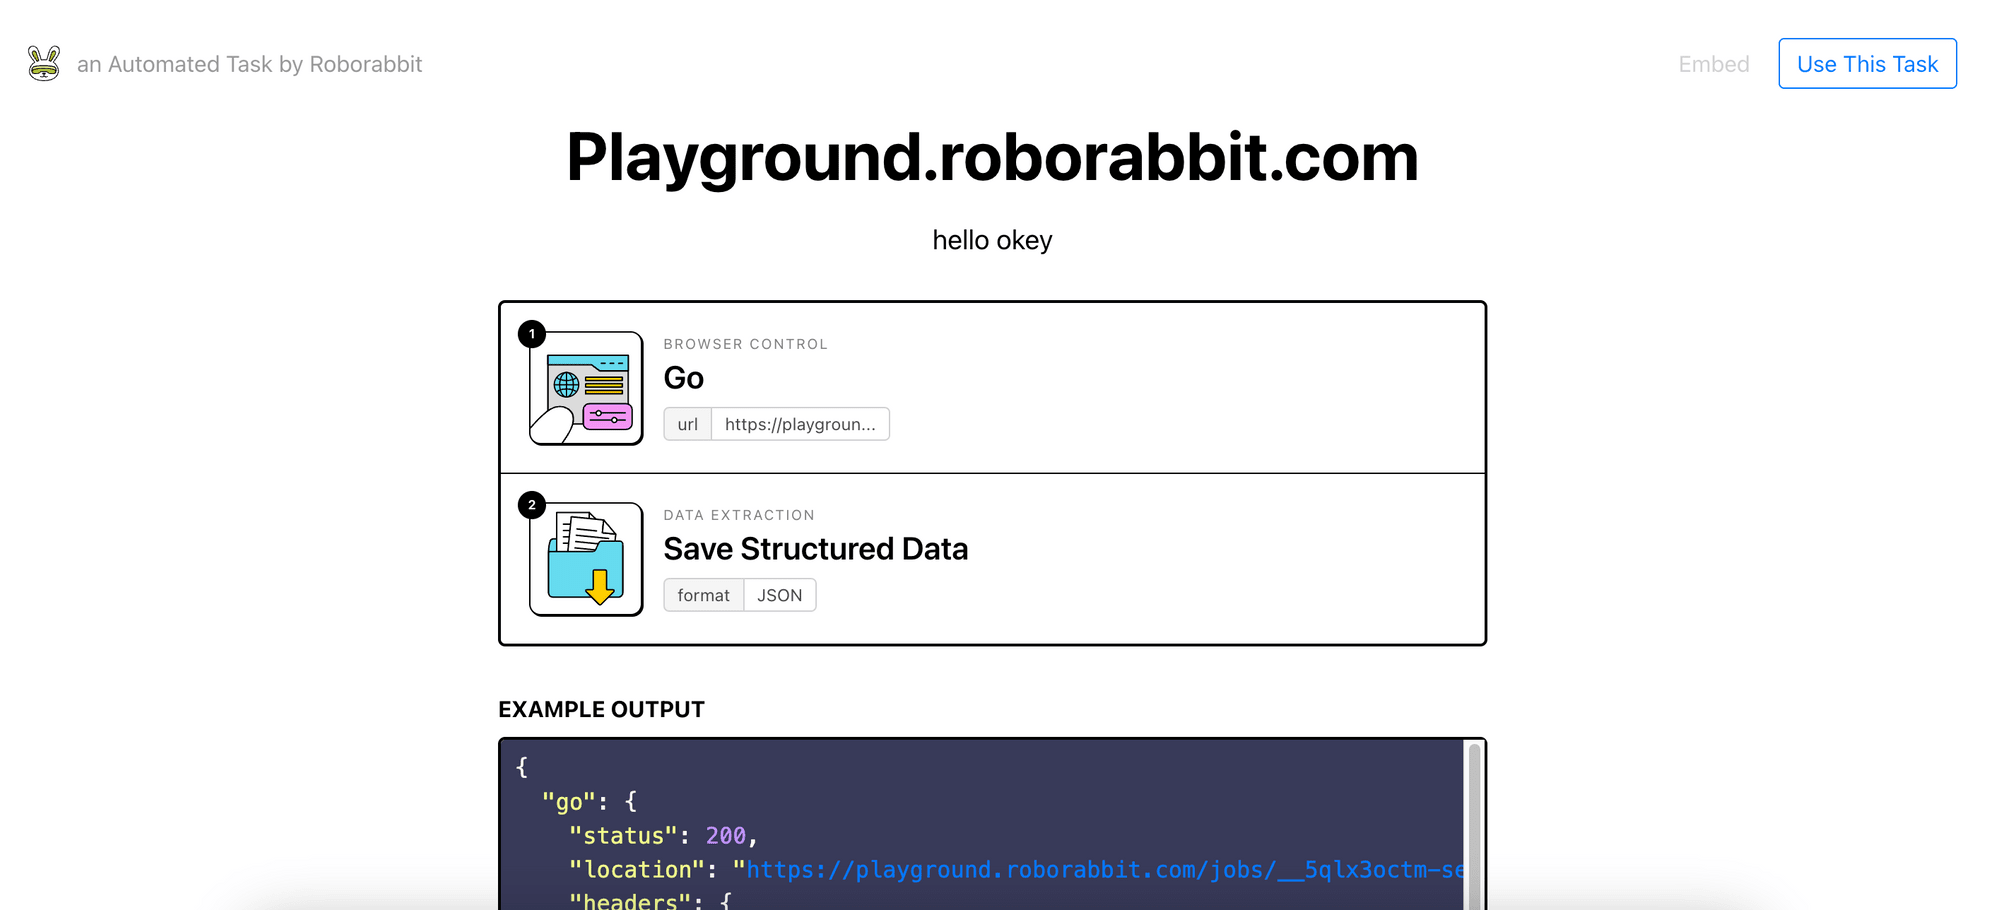
3. Save Structured Data - Single Page Data Scraping
This task goes to an URL (Roborabbit's job board playground), extracts data from selected HTML elements, and saves them as structured data in JSON format. You can use it to extract data from a single web page that has no pagination.
Result:
{
  "go": {
    "status": 200,
    ...
  },
  "save_structured_data": {
    "title": "How to Auto-Fill Forms with Data from a CSV File in Python Using Browserbear",
    "description": "Filling in numerous web forms manually lacks efficiency, accuracy, and consistency. Let’s learn how to fix this by doing it automatically, using data from a CSV file with Python and Browserbear.",
    "author_date": "by Josephine Loo · June 2023",
    "category": "Developers"
  }
}
4. Loop and Save Data - Multi-page Data Scraping
This task works similarly to the previous job data extraction task, but it caters to scenarios where there are multiple pages by looping through the URLs that are saved in Step 2.
Result:
{
  "go": {
    "status": 200,
    ...
  },
  "save_attribute": [
    "/blog/how-to-auto-fill-forms-with-data-from-a-csv-file-in-python-using-browserbear/",
    "/blog/xpath-cheat-sheet-a-quick-reference-to-essential-xpath-expressions/",
    "/blog/solving-captchas-automatically-with-browserbear/",
    "/blog/how-to-use-curl-in-python-with-examples/",
    "/blog/a-brief-guide-to-line-items-arrays-and-strings-in-zapier/",
    ...
  ],
  "save_structured_data": [
    {
      "link": "https://www.browserbear.com/blog/how-to-auto-fill-forms-with-data-from-a-csv-file-in-python-using-browserbear/",
      "title": "How to Auto-Fill Forms with Data from a CSV File in Python Using Browserbear",
      "author_date": "by Josephine Loo · June 2023",
      "description": "Filling in numerous web forms manually lacks efficiency, accuracy, and consistency. Let’s learn how to fix this by doing it automatically, using data from a CSV file with Python and Browserbear.",
      "image": "/images/ghost/2023-06-14-how-to-auto-fill-forms-with-data-from-a-csv-file-in-python-using-browserbear/BrBT_FillinForms-02-01.png"
    },
    {
      "link": "https://www.browserbear.com/blog/xpath-cheat-sheet-a-quick-reference-to-essential-xpath-expressions/",
      "title": "XPath Cheat Sheet: A Quick Reference to Essential XPath Expressions",
      "author_date": "by Josephine Loo · June 2023",
      "description": "While XPath expressions are incredibly useful to locate an HTML element, it can be challenging to accurately navigate through complex and nested HTML/XML structures. If you’re struggling with writing XPath expressions, use this cheat sheet to prepare them effortlessly.",
      "image": "/images/ghost/2023-06-07-xpath-cheat-sheet-a-quick-reference-to-essential-xpath-expressions/BrBT_xpathcheat-01.png"
    },
    {
      "link": "https://www.browserbear.com/blog/solving-captchas-automatically-with-browserbear/",
      "title": "Solving CAPTCHAs Automatically with Browserbear: A Beginner's Guide",
      "author_date": "by Julianne Youngberg · June 2023",
      "description": "CAPTCHA-solving tools allow browser automations to access bot-protected sites. In this article, learn how to integrate them with your Browserbear tasks.",
      "image": "/images/ghost/2023-06-06-solving-captchas-automatically-with-browserbear/12.2-Thumbnail.png"
    }
    ...
  ]
}
###
Conclusion
These are some of the ways you can use Roborabbit to automate the web browser. While there are several automated browser tools and frameworks available, Roborabbit helps you automate the web browser with less code while still allows you to modify/control it using code.
The importance of automation in today's digital age cannot be overstated. If you want to start automating the web browser, sign up for a Roborabbit trial account! It only takes a few minutes to run your first web browser automation.